ProxySQL 实战
![]()
ProxySQL 简介
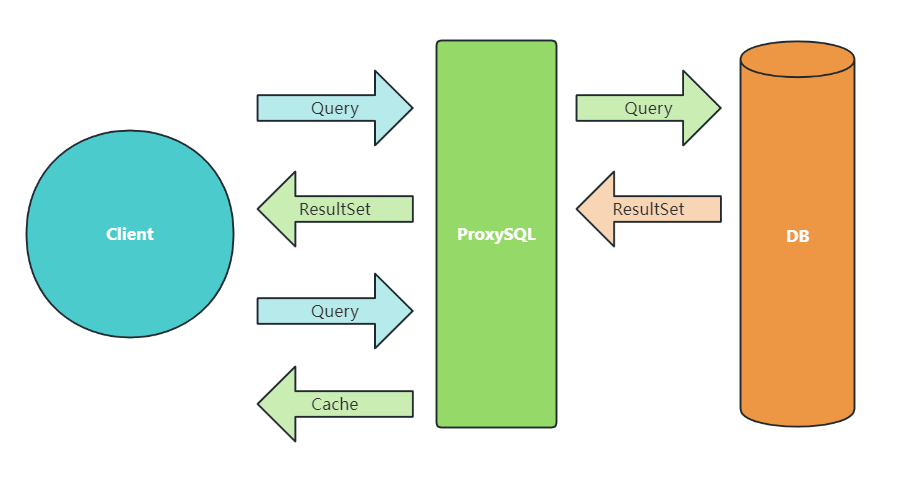
定位
作为 client 与数据库的中间层
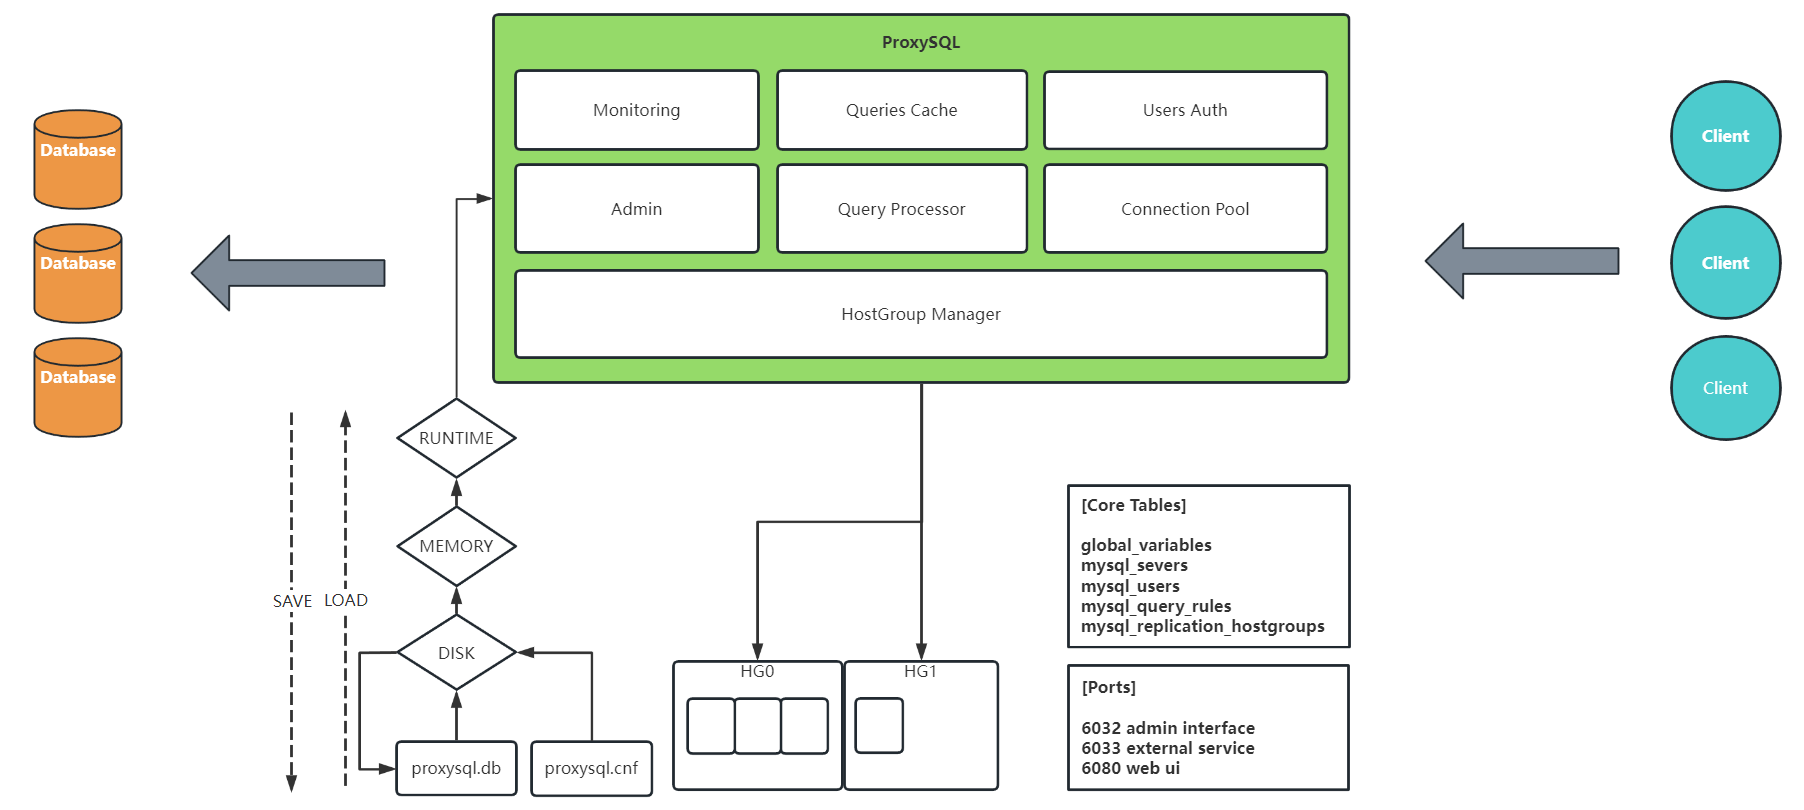
作用
简化数据库操作、提升基础设施性能
功能
| 读写分离 | 负载均衡 | 高可用 | 查询缓存 |
|---|---|---|---|
| 分片查询 | SQL 改写 | SQL 拦截 | SQL 镜像 |
特性
- 连接池
- 动态配置
- 监控与统计
安装与运行
Ubuntu/Debian
# 添加 repository 源

apt-get install -y --no-install-recommends lsb-release wget apt-transport-https ca-certificates gnupg
wget -O - 'https://repo.proxysql.com/ProxySQL/proxysql-3.0.x/repo_pub_key' | apt-key add -
echo deb https://repo.proxysql.com/ProxySQL/proxysql-3.0.x/$(lsb_release -sc)/ ./ | tee /etc/apt/sources.list.d/proxysql.list

# 安装
apt-get update
apt-get install proxysql

# 验证安装
proxysql --version

# 启动,-f 为在前台运行,要在后台运行需要去掉 -f 参数
proxysql -f -c /etc/proxysql.cnf

systemctl start proxysql
RedHat/CentOS
# 添加 repository 源

cat <<EOF | tee /etc/yum.repos.d/proxysql.repo
[proxysql_repo]
name=ProxySQL repository
baseurl=https://repo.proxysql.com/ProxySQL/proxysql-3.0.x/centos/\$releasever
gpgcheck=1
gpgkey=https://repo.proxysql.com/ProxySQL/proxysql-3.0.x/repo_pub_key
EOF

# 安装
yum install proxysql

# 验证安装
proxysql --version

# 启动,-f 为在前台运行,要在后台运行需要去掉 -f 参数
proxysql -f -c /etc/proxysql.cnf

systemctl start proxysql
Docker
docker run -p 6032:6032 -p 6033:6033 -p 6070:6070 -d -v /path/to/proxysql.cnf:/etc/proxysql.cnf proxysql/proxysql
配置管理
配置文件
默认配置文件位于 /etc/proxysql.cnf,例:
datadir="/var/lib/proxysql"
errorlog="/var/lib/proxysql/proxysql.log"
admin_variables=
{
    # admin:admin 为本地登录的用户及密码
    # radmin:radmin 为远程登录的用户及密码
    admin_credentials="admin:admin;radmin:radmin"
    mysql_ifaces="0.0.0.0:6032"  # 管理端口
}
mysql_variables=
{
    threads=4
    interfaces="0.0.0.0:6033" # 曝露的 MySQL 协议端口
    # ...
}
# ...
管理
mysql -u admin -padmin -h 127.0.0.1 -P6032 --prompt='ProxySQLAdmin>'
# MySQL客户端 8.0.4 及更高版本需添加 --default-auth=mysql_native_password 参数

ProxySQLAdmin> SHOW DATABASES;
+-----+------------------+-------------------------------------+
| seq | name             | file                                |
+-----+------------------+-------------------------------------+
| 0   | main             |                                     | # 内存中的配置数据库,可查询和更新 ProxySQL 的配置(其中 runtime_xxx 的表是 ProxySQL 运行时配置,只可查询不可更改)
| 2   | disk             | /var/lib/proxysql/proxysql.db       | # main 的本地持久化数据
| 3   | stats            |                                     | # 收集的运行时指标
| 4   | monitor          |                                     | # ProxySQL 连接的后端数据库服务器相关的监控指标
+-----+------------------+-------------------------------------+
4 rows in set (0.00 sec)
配置的生命周期
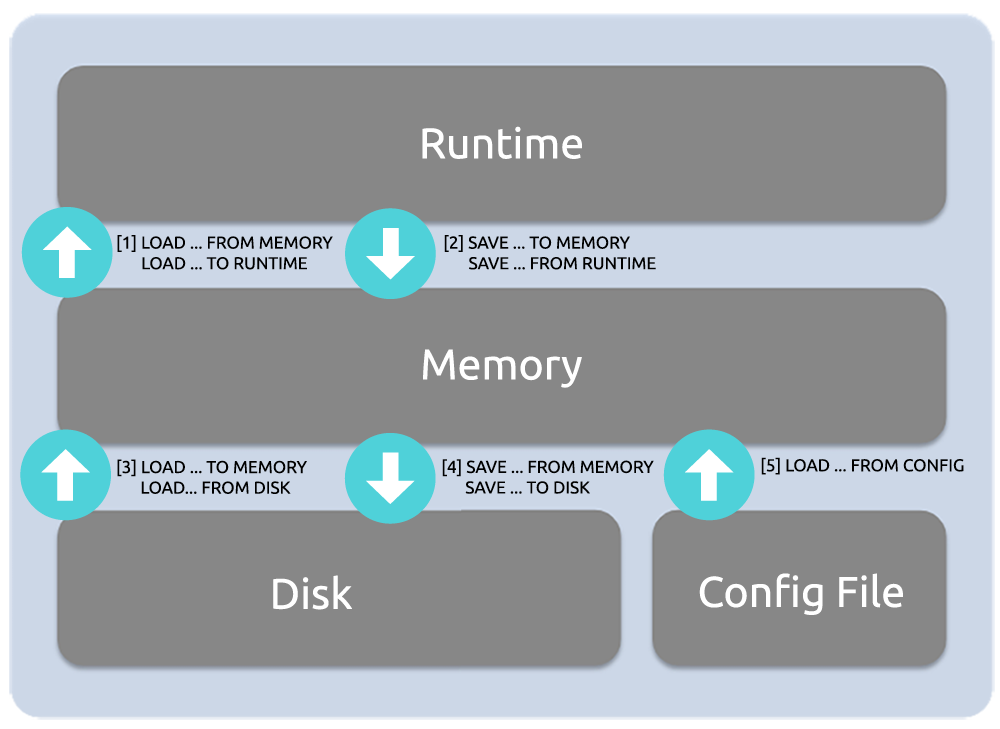
- RUNTIME
程序运行时的配置,可查看、不可直接更改
- MEMORY
通过 MySQL 接口曝露出来的内存数据库要,可查看、可更改,需要 LOAD xxx TO RUNTIME 才会生效
- DISK/CONFIG
- DISK: 磁盘上的 SQLite3 数据库(
/var/lib/proxysql/proxysql.db),可将 MEMORY 数据持久化到磁盘上,下次启动时直接加载使用 - CONFIG: 首次启动时加载的
/etc/proxysql.cnf配置文件,当 SQLite3 数据库存在时,会从 SQLite3 读取配置,不再使用 proxysql.cnf 配置文件
核心的配置表
- main.mysql_servers 添加的后端数据库服务器
- main.mysql_users 用来连接后端数据库服务器的用户凭证
- main.mysql_query_rules 查询规则,用于更改查询/查询缓存等
- main.global_variables 全局变量
- 其它表
- monitor.mysql_server_ping_log 后端数据库服务器健康检查日志
- monitor.mysql_server_connect_log 后端数据库服务器连接日志
- stats.stats_mysql_query_digest 后端数据库服务器的查询统计情况
上手实战
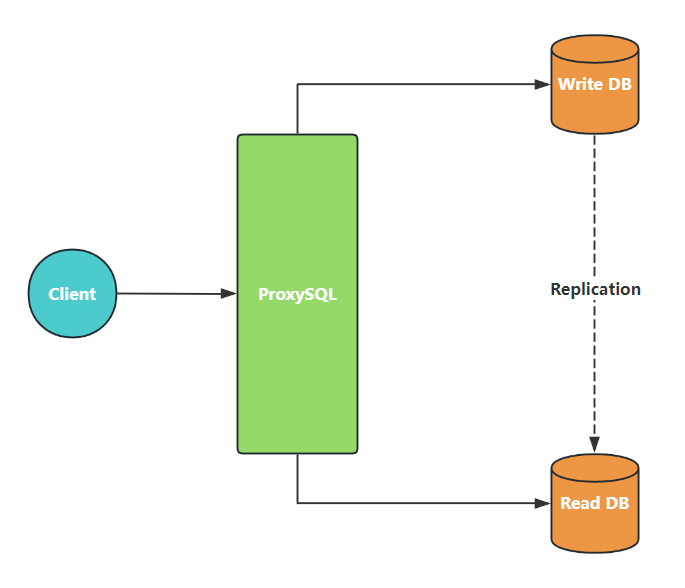
读写分离
(1)在后端 MySQL 主实例创建监控、连接账号
-- 创建监控账号
CREATE USER 'monitor'@'%' IDENTIFIED BY '123456';
GRANT REPLICATION CLIENT ON *.* TO 'monitor'@'%';

-- GROUP REPLICATION
GRANT SELECT ON performance_schema.replication_group_member_stats TO 'monitor'@'%';
GRANT SELECT ON performance_schema.replication_group_members TO 'monitor'@'%';

-- 创建连接的账号
CREATE USER 'app'@'%' IDENTIFIED BY '123456';
GRANT ALL PRIVILEGES ON *.* TO 'app'@'%';
(2)在 ProxySQL 中配置后端数据库服务器、监控账号、连接账号
-- 添加后端数据库服务器
-- 注:ProxySQL 默认不感知主从延迟,必须手动配置 max_replication_lag,或配合外部工具动态剔除延迟高的从库,否则读写不一致风险非常大
-- max_replication_lag 如果某个读库延迟超过 3 秒,就不再用于查询负载(被 ProxySQL 自动从查询目标中剔除,只对 SELECT 有效)
INSERT INTO mysql_servers
(hostgroup_id, hostname, port, max_replication_lag)
VALUES
(100, '172.16.121.236', 3380, 3),
(101, '172.16.121.237', 3380, 3),

-- 使配置生效、配置持久化
LOAD MYSQL SERVERS TO RUNTIME;
LOAD MYSQL SERVERS TO DISK;

 -- 每 5 秒检测一次主从延迟情况
SET mysql-monitor_replication_lag_interval = 5000;

-- 设置监控账号
UPDATE global_variables
SET variable_value='monitor'
WHERE variable_name='mysql-monitor_username';

UPDATE global_variables
SET variable_value='123456'
WHERE variable_name='mysql-monitor_password';

-- 使配置生效、配置持久化
LOAD MYSQL VARIABLES TO RUNTIME;
LOAD MYSQL VARIABLES TO DISK;

-- 添加连接的用户信息
-- transaction_persistent=1:事务内保持在同一个后端,不因规则改变。
INSERT INTO mysql_users
(username, password, transaction_persistent, backend, frontend, comment)
VALUES
('app', '123456', 1, 1, 1, '');

-- 使配置生效、配置持久化
LOAD MYSQL USERS TO RUNTIME;
LOAD MYSQL USERS TO DISK;

-- 配置读写分离规则
INSERT INTO mysql_query_rules
(rule_id, username, match_pattern, destination_hostgroup, active, apply, comment)
VALUES
(101, 'app', '^SELECT.*FOR UPDATE$', 1, 1, 1, ''),
(102, 'app', '^BEGIN', 1, 1, 1, ''),
(103, 'app', '^SELECT', 2, 1, 1, ''),

-- 使配置生效、配置持久化
LOAD MYSQL QUERY RULES TO RUNTIME;
LOAD MYSQL QUERY RULES TO DISK;
数据库负载均衡
INSERT INTO mysql_servers
(hostgroup_id, hostname, port, weight, max_connections)
VALUES
(20, 'mysql-read1', 3306, 100, 1000),
(20, 'mysql-read2', 3306, 100, 1000);

INSERT INTO mysql_query_rules
(rule_id, match_pattern, destination_hostgroup, apply)
VALUES
(1, '^SELECT.*', 20, 1);


LOAD MYSQL SERVERS TO RUNTIME;
LOAD MYSQL SERVERS TO DISK;
LOAD MYSQL QUERY RULES TO RUNTIME;
LOAD MYSQL QUERY RULES TO DISK;
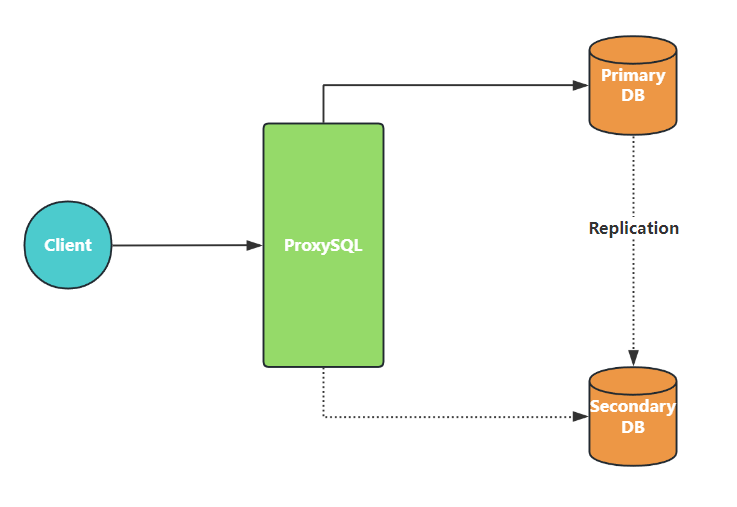
数据库故障自动切换
当后端 MySQL 主库出现问题时,将 ProxySQL 读写请求自动切换到新的主库上
(1)在 ProxySQL 上配置 mysql_replication_hostgroups
INSERT INTO mysql_replication_hostgroups
(writer_hostgroup, reader_hostgroup, check_type, comment)
VALUES
(1, 2, 'read_only', 'mysql mm cluster');

LOAD MYSQL SERVERS TO RUNTIME;
LOAD MYSQL SERVERS TO DISK;
将主库和备库的 hostgroup 配置到 mysql_replication_hostgroups 表中后,ProxySQL 会检测主备库的 read_only 状态
- 当检测到 read_only 从 OFF 变成 ON 时,会将 writer_hostgroup 中的主机添加到 reader_hostgroup 中
- 当检测到 read_only 从 ON 变成 OFF 时,会将主机从 reader_hostgroup 中移到 writer_hostgroup 中
当一个后端 MySQL 实例的 read_only 状态从 ON 变成 OFF 时,会将实例加入到 writer_hostgroup 中,同时该实例依然位于 read_hostgroup 中
SELECT hostgroup_id, hostname, port , status FROM runtime_mysql_servers WHERE hostgroup_id IN (100, 101);
+--------------+----------------+------+--------+
| hostgroup_id | hostname       | port | status |
+--------------+----------------+------+--------+
| 100          | 172.16.121.237 | 3380 | ONLINE |
| 101          | 172.16.121.236 | 3380 | ONLINE |
| 101          | 172.16.121.237 | 3380 | ONLINE |
+--------------+----------------+------+--------+
可以看到,节点 172.16.121.237:3380 同时位于两个 hostgroup
如果需要将实例从 read hostgroup 中移除,需要将参数 mysql-monitor_writer_is_also_reader 设置为 false
SET mysql-monitor_writer_is_also_reader = 'false';
LOAD MySQL VARIABLES TO RUNTIME;
LOAD MYSQL VARIABLES TO DISK;
然后再重新加载配置,就可以将设置了 read_only 状态的后端实例从 read hostgroup 中移除
LOAD MYSQL SERVERS TO RUNTIME;

SELECT hostgroup_id, hostname, port , status FROM runtime_mysql_servers WHERE hostgroup_id IN (100, 101);
+--------------+----------------+------+--------+
| hostgroup_id | hostname       | port | status |
+--------------+----------------+------+--------+
| 100          | 172.16.121.237 | 3380 | ONLINE |
| 101          | 172.16.121.236 | 3380 | ONLINE |
+--------------+----------------+------+--------+
ProxySQL 只根据后端 MySQL 的 read_only 状态来判断将实例放到 write hostgroup 或 read hostgroup,所以需要正确地设置 read_only 状态
- 如果主备实例都设置了 read_only=OFF,则会发生双写,容易引起数据不一致
- 如果在备库复制有延迟或备库复制中断的情况下,将备库的 read_only 设置为 OFF,同样也可能会引起数据不一致
后端 MySQL 实例的高可用,需要借助其它方式来实现,如 MHA、或者使用 MySQL Group Replication
ProxySQL 集群
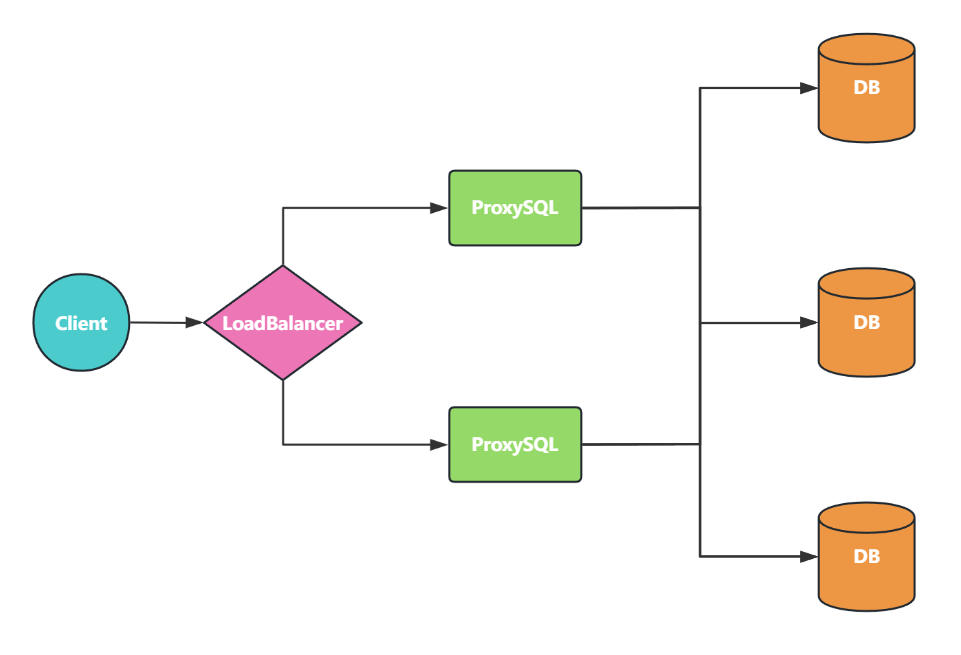
ProxySQL 作为一个程序,本身也可能出现故障,部署 ProxySQL 的服务器也肯定会出现故障。高可用架构的一个基本原则是消除单点。
可以在多个节点上部署 ProxySQL,在 ProxySQL 之前再加一层负载均衡(如使用 LVS 或其它技术),从而消除 ProxySQL 单点风险,也可以使用 Keepalived 等技术来实现 ProxySQL 的高可用
部署多台 ProxySQL 后,需要确保多台 ProxySQL 的配置同步,不然就可能会引起客户端访问出错。可以使用 ProxySQL 自带的集群功能来保证多个节点之间的配置信息同步
开启 ProxySQL 的集群功能,需要:
- 配置 Cluster 账号,用于查询对比集群内各 ProxySQL 节点的配置信息
- 配置 proxysql_servers,将集群内的 ProxySQL 节点信息添加到 proxysql_servers 表
以上操作需要到组成集群的每一个 ProxySQL 节点上执行
(1)配置 Cluster 账号
通过参数 admin-cluster_username 和 admin-cluster_password 设置 cluster 账号,不能使用 admin 账号作为 cluster 账号,因为 admin 账号只能在本地(127.0.0.1)登录
同时还需要将 cluster 账号添加到参数 admin-admin_credentials 中
SET admin-admin_credentials = 'admin:admin;clusteradmin:passadmin';

SET admin-cluster_username='clusteradmin';
SET admin-cluster_password='passadmin';

LOAD ADMIN VARIABLES TO RUNTIME;
LOAD ADMIN VARIABLES TO DISK;
(2)使用 ProxySQL 集群
将组成 ProxySQL 集群的多个节点的信息添加到 proxysql_servers 表
 SHOW CREATE TABLE proxysql_servers\G
*************************** 1. row ***************************
       table: proxysql_servers
Create Table: CREATE TABLE proxysql_servers (
    hostname VARCHAR NOT NULL,
    port INT NOT NULL DEFAULT 6032,
    weight INT CHECK (weight >= 0) NOT NULL DEFAULT 0,
    comment VARCHAR NOT NULL DEFAULT '',
    PRIMARY KEY (hostname, port) )
1 row in set (0.00 sec)

INSERT INTO proxysql_servers
(hostname, port, weight, comment)
VALUES
('172.16.121.234', 6032, 1, 'proxysql node 1'),
('172.16.121.236', 6032, 1, 'proxysql node 2');

LOAD PROXYSQL SERVERS TO RUNTIME;
save PROXYSQL SERVERS TO disk;
配置完成后,在其中一个节点修改配置,观察配置是否同步到集群的其它节点
SQL 改写
DELETE FROM mysql_query_rules;

INSERT INTO mysql_query_rules
(rule_id, username,
 match_pattern, replace_pattern,
  destination_hostgroup,
  active, apply, comment)
VALUES
(20, 'app',
  '^SELECT\s+(.*?)\s+FROM\s+ta\s+where\s+a\s+=\s+(\d+)$', 'SELECT \1 FROM ta force index(idx_a) WHERE A = \2',
  101,
  1, 1, 'add force index');

LOAD MYSQL QUERY RULES TO RUNTIME;
LOAD MYSQL QUERY RULES TO DISK;
在上面的例子中,我们可以在不改变应用程序的情况,给 SQL 查询加上 FORCE INDEX
SQL 镜像
使用 ProxySQL 的镜像功能,可以将 SQL 发送到一个额外的后端数据库实例执行
还可以将发送到镜像的 SQL 进行改写,以测试修改后的 SQL 是否能正常执行
DELETE FROM mysql_query_rules;

-- 执行 SQL,同时将 SQL mirror 一份
INSERT INTO mysql_query_rules
(rule_id, username, match_pattern, destination_hostgroup,
 mirror_flagOut, active, apply, comment )
values (20, 'app', '^SELECT', 100,
  1001,
  1, 1, 'mirror');

-- 对于 mirror 的SQL,增加注释,发送到 hostgroup 101 执行
INSERT INTO mysql_query_rules
(rule_id, username, flagIn, match_pattern, destination_hostgroup,
 replace_pattern, active, apply, comment )
values (21, 'app', 1001, '^SELECT', 101,
  'select /*+ mirrored */', 1, 1, 'mirror sql modified');

LOAD MYSQL QUERY RULES TO RUNTIME;
LOAD MYSQL QUERY RULES TO DISK;
SQL 拦截
利用 mysql_query_rules 表中的 error_msg 字段,可以实现 SQL 黑名单的功能,如果规则设置了 error_msg,当 SQL 语句匹配这条规则时,ProxySQL 会直接将 error_msg 的内容返回给客户端
当遇到一些大查询严重影响数据库性能时,可以使用 ProxySQL 规则临时屏蔽这些 SQL
- 查询 stats_mysql_query_digest
可以先从 stats_mysql_query_digest 查询需要屏蔽的 SQL,这里我们选择按查询的 digest 精确屏某一类 SQL
 SELECT * FROM stats.stats_mysql_query_digest LIMIT 1\G
*************************** 1. row ***************************
        hostgroup: 101
       schemaname: information_schema
         username: app
   client_address:
           digest: 0x7ae1f8f3a35c883d
      digest_text: SELECT * FROM information_schema.tables AS t LIMIT ?
       count_star: 1
       first_seen: 1690941618
        last_seen: 1690941618
         sum_time: 2822
         min_time: 2822
         max_time: 2822
sum_rows_affected: 0
    sum_rows_sent: 1
- 配置屏蔽规则
我们选择按查询的 digest 来屏蔽,往 mysql_query_rules 写入如下规则
INSERT INTO mysql_query_rules
(rule_id, username, digest, error_msg, active, apply, comment )
VALUES
(10, 'app', '0xa6843869f14d13ce', 'request denied by rule', 1,1, 'request denied by rule');

LOAD MYSQL QUERY RULES TO RUNTIME;
LOAD MYSQL QUERY RULES TO DISK;
需要注意,屏蔽规则的 rule_id 需要比其它规则的 rule_id 小,ProxySQL 是按 rule_id 的顺序依次判断是否匹配规则
- 测试屏蔽效果
使用 digest,屏蔽的是一类 SQL,如果 SQL 只是传入的参数有差异,则 SQL 的 digest 一样,那么也会有匹配该规则
mysql> SELECT * FROM information_schema.tables LIMIT 1;
ERROR 1148 (42000): request denied by rule

mysql> SELECT * FROM information_schema.tables LIMIT 2;
ERROR 1148 (42000): request denied by rule
分片查询
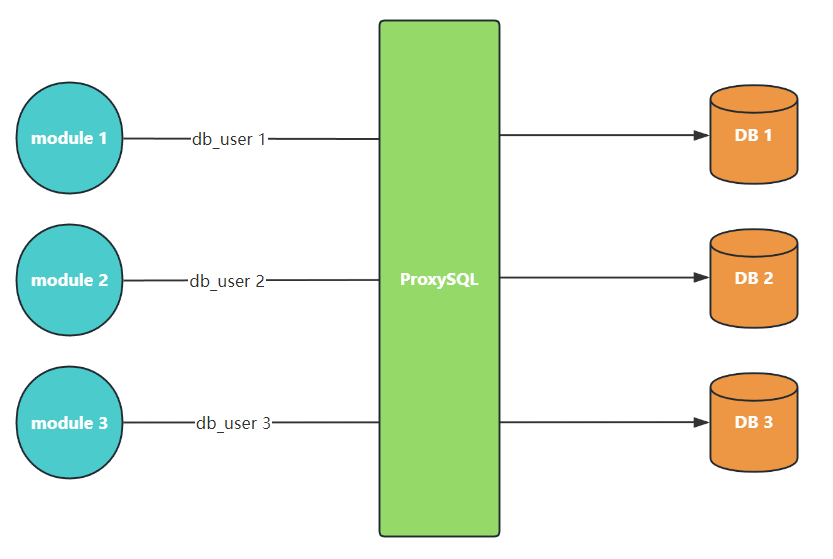
基于用户分片查询
 ****
****
这是最简单的分片方式,通过添加配置不同的用户,将其指向不同的 hostgroup,进行对于不同用户连接进来时,将其请求分发至对应的后端数据库
INSERT INTO mysql_users
(username, password, active, default_hostgroup, comment)
VALUES
('accounts', 'shard0_pass', 1, 0, 'Routed to the accounts shard'),
('transactions', 'shard1_pass', 1, 1, 'Routed to the transactions shard'),
('logging', 'shard2_pass', 1, 2, 'Routed to the logging shard');

LOAD MYSQL USERS RULES TO RUNTIME;
SAVE MYSQL USERS RULES TO DISK;
基于 schema(库名)分片查询
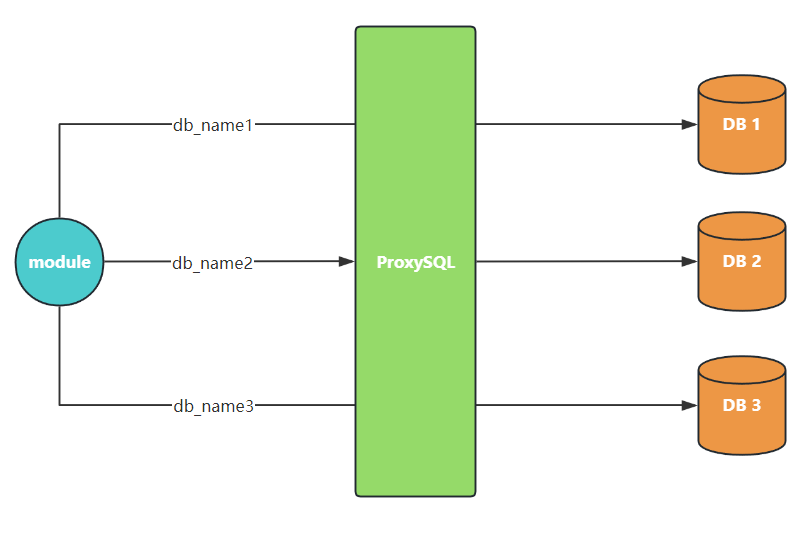
基于 schema 的分片与上述基于用户的分片方式类型,通过对于不同的 schema(库名)配置不同的 hostgroup,进行实现请求的分发
INSERT INTO mysql_query_rules (rule_id, active, schemaname,
destination_hostgroup, apply)
VALUES
(1, 1, 'shard_0', 0, 1),
(2, 1, 'shard_1', 1, 1),
(3, 1, 'shard_2', 2, 1);

LOAD MYSQL QUERY RULES TO RUNTIME;
SAVE MYSQL QUERY RULES TO DISK;
基于数据分片查询
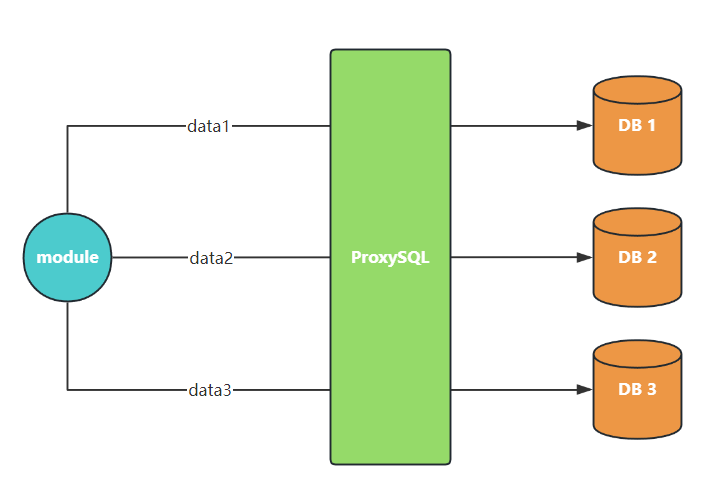
基于数据的分片查询意味着我们是对特定表进行分片查询,往往需要用到 match_digest 或 match_pattern
现有两种表 loc_account_data、loc_mapping
# loc_account_data
+----------------------------------------+---------+---------+
| loc_id                                 | user    | acc_id  |
+----------------------------------------+---------+---------+
| 20086020554955909836090724037181646035 | joe32   | 1       |
| 21503957780049285539986052866765125704 | sam57   | 2       |
| 75863560943999160082133817802533222835 | pam18   | 3       |
+----------------------------------------+---------+---------+

# loc_mapping
+----------------------------------------+---------+
| loc_id                                 | region  |
+----------------------------------------+---------+
| 20086020554955909836090724037181646035 | AMERICA |
| 21503957780049285539986052866765125704 | EMEA    |
| 75863560943999160082133817802533222835 | OCEANIA |
+----------------------------------------+---------+
添加如下规则用于 INSERT 请求
INSERT INTO mysql_query_rules (rule_id, active, match_pattern, destination_hostgroup, apply)
VALUES
(1, 1, 'loc_account_data \(loc_id, user, acc_id\) VALUES
\(20086020554955909836090724037181646035', 0, 1),
(2, 1, 'loc_account_data \(loc_id, user, acc_id\) VALUES
\(21503957780049285539986052866765125704', 1, 1),
(3, 1, 'loc_account_data \(loc_id, user, acc_id\) VALUES
\(75863560943999160082133817802533222835', 2, 1);
添加如下规则用于 UPDATE/DELETE/SELECT 请求
INSERT INTO mysql_query_rules (rule_id, active, match_pattern, destination_hostgroup, apply)
VALUES
(4, 1, 'loc_id = 20086020554955909836090724037181646035', 0, 1),
(5, 1, 'loc_id = 21503957780049285539986052866765125704', 1, 1),
(6, 1, 'loc_id = 75863560943999160082133817802533222835', 2, 1);
注:当往 loc_mapping 表添加数据时,需要同步在 mysql_query_rules 里添加对应的路由规则
查询缓存
以往对于 MySQL 有 2 种使用缓存方法:
- 对于 MySQL 启用查询缓存:嵌入在 MySQL 服务器本身,无外部依赖。但对于写密集型的工作负载来说,它是一个瓶颈,因为当相关表收到写入时,缓存条目将失效
- 使用外部缓存:允许很大灵活性,但同时需要大量的应用程序逻辑更改,因为应用必须同时连接到数据库和缓存系统,并负载保持更新
首先我们在 ProxySQL 通过 stats_mysql_query_digest_reset 查看 SQL 统计信息
SELECT count_star,sum_time,hostgroup,digest,digest_text FROM stats_mysql_query_digest_reset ORDER BY sum_time DESC;
+------------+-----------+-----------+--------------------+-------------------------------------------------------------------+
| count_star | sum_time  | hostgroup | digest             | digest_text                                                       |
+------------+-----------+-----------+--------------------+-------------------------------------------------------------------+
| 366300     | 508306254 | 1         | 0xE8930CB2CC9E68D7 | SELECT c from sbtest where id=?                                   |
| 3663       | 6932505   | 1         | 0xB749413737FAF581 | SELECT DISTINCT c from sbtest where id between ? and ? order by c |
| 3663       | 6607248   | 1         | 0x78881FD58E5437B2 | SELECT c from sbtest where id between ? and ? order by c          |
| 3663       | 5534740   | 1         | 0x547C0EAF9BC36E91 | SELECT SUM(K) from sbtest where id between ? and ?                |
| 3663       | 5506153   | 1         | 0xDC1EE02F8CD8B09B | SELECT c from sbtest where id between ? and ?                     |
| 1          | 2372      | 1         | 0xD575B97BB01C8428 | SHOW TABLE STATUS LIKE ?                                          |
+------------+-----------+-----------+--------------------+-------------------------------------------------------------------+
6 rows in set (0.00 sec)
毫无疑问,大部分执行时间来自单一类型的 ,执行多次
我们通过查询规则的 cache_ttl 对其设置 2000 毫秒的缓存时长
INSERT INTO mysql_query_rules
(rule_id,active,digest,cache_ttl,apply)
VALUES (5,1,'0xE8930CB2CC9E68D7', 2000,1);

LOAD MYSQL QUERY RULES TO RUNTIME;
LOAD MYSQL QUERY RULES TO DISK;
重新在 Client 重新运行查询一段时间后,再次观察 stats_mysql_query_digest_reset
SELECT count_star,sum_time,hostgroup,digest,digest_text FROM stats_mysql_query_digest ORDER BY sum_time DESC;
+------------+-----------+-----------+--------------------+-------------------------------------------------------------------+
| count_star | sum_time  | hostgroup | digest             | digest_text                                                       |
+------------+-----------+-----------+--------------------+-------------------------------------------------------------------+
| 114715     | 119933775 | 1         | 0xE8930CB2CC9E68D7 | SELECT c from sbtest where id=?                                   |
| 6783       | 8244945   | 1         | 0xB749413737FAF581 | SELECT DISTINCT c from sbtest where id between ? and ? order by c |
| 6800       | 8081234   | 1         | 0x78881FD58E5437B2 | SELECT c from sbtest where id between ? and ? order by c          |
| 6877       | 7923794   | 1         | 0xDC1EE02F8CD8B09B | SELECT c from sbtest where id between ? and ?                     |
| 6840       | 7535059   | 1         | 0x547C0EAF9BC36E91 | SELECT SUM(K) from sbtest where id between ? and ?                |
| 1          | 2199      | 1         | 0xD575B97BB01C8428 | SHOW TABLE STATUS LIKE ?                                          |
| 8729       | 0         | -1        | 0xB749413737FAF581 | SELECT DISTINCT c from sbtest where id between ? and ? order by c |
| 8672       | 0         | -1        | 0x547C0EAF9BC36E91 | SELECT SUM(K) from sbtest where id between ? and ?                |
| 8712       | 0         | -1        | 0x78881FD58E5437B2 | SELECT c from sbtest where id between ? and ? order by c          |
| 8635       | 0         | -1        | 0xDC1EE02F8CD8B09B | SELECT c from sbtest where id between ? and ?                     |
| 1436485    | 0         | -1        | 0xE8930CB2CC9E68D7 | SELECT c from sbtest where id=?                                   |
+------------+-----------+-----------+--------------------+-------------------------------------------------------------------+
其中 hostgroup=-1 表示直接从查询缓存提供的流量,其不会到达后端数据库服务器
我们可以通过 mysql-query_cache_size 调整缓存占用的内存总量
SHOW VARIABLES LIKE 'mysql-query_cache%';
+---------------------------+-------+
| Variable_name             | Value |
+---------------------------+-------+
| mysql-query_cache_size_MB | 256   |
+---------------------------+-------+

 SET mysql-query_cache_size_MB=128;

LOAD MYSQL VARIABLES TO RUNTIME;
LOAD MYSQL VARIABLES TO DISK;
连接池
维护客户端连接与后端数据库连接的复用池,避免频繁建立连接,提升性能并节省资源
-- 设置最大连接数
UPDATE mysql_servers SET max_connections = 1000 WHERE hostgroup_id = 20;

-- 查询连接池信息
SELECT * FROM stats_mysql_connection_pool;
监控
stats 数据库
从 stats 数据库中可以查到 ProxySQL 一些内部组件的状态,如内存使用情况、连接池信息、会话信息、SQL执行状态等
SHOW TABLES FROM stats;
+---------------------------------------+
| tables                                |
+---------------------------------------+
| global_variables                      |
| stats_memory_metrics                  |
| stats_mysql_client_host_cache         |
| stats_mysql_client_host_cache_reset   |
| stats_mysql_commands_counters         |
| stats_mysql_connection_pool           |
| stats_mysql_connection_pool_reset     |
| stats_mysql_errors                    |
| stats_mysql_errors_reset              |
| stats_mysql_free_connections          |
| stats_mysql_global                    |
| stats_mysql_gtid_executed             |
| stats_mysql_prepared_statements_info  |
| stats_mysql_processlist               |
| stats_mysql_query_digest              |
| stats_mysql_query_digest_reset        |
| stats_mysql_query_rules               |
| stats_mysql_users                     |
| stats_proxysql_message_metrics        |
| stats_proxysql_message_metrics_reset  |
| stats_proxysql_servers_checksums      |
| stats_proxysql_servers_clients_status |
| stats_proxysql_servers_metrics        |
| stats_proxysql_servers_status         |
+---------------------------------------+
ProxySQL Exporter
ProxySQL 内置 Promethus Exporter,可通过参数 admin-restapi_enabled 开启
SET admin-restapi_enabled='true';
SET admin-restapi_port='6070';
SET admin-prometheus_memory_metrics_interval='60';

LOAD ADMIN VARIABLES TO RUNTIME;
LOAD ADMIN VARIABLES TO DISK;
开启后,访问 admin-restapi_port 就可以获取到监控数据
curl http://127.0.0.1:6070/metrics
exporter 的数据很多从 stats数据库也能获取到。可以使用 Prometheus 采集监控数据,使用 Grafana 仪表盘展示
Admin Web
可通过参数 admin-web_enabled 开启 Admin Web
SET admin-web_enabled='true';
SET admin-web_port=6080;
SET admin-stats_credentials='stats:stats';

LOAD ADMIN VARIABLES TO RUNTIME;
LOAD ADMIN VARIABLES TO DISK;
访问 Admin Web 的账号和密码由参数 admin-stats_credentials 指定,通过 Admin Web 可以查看 ProxySQL 的相关信息:
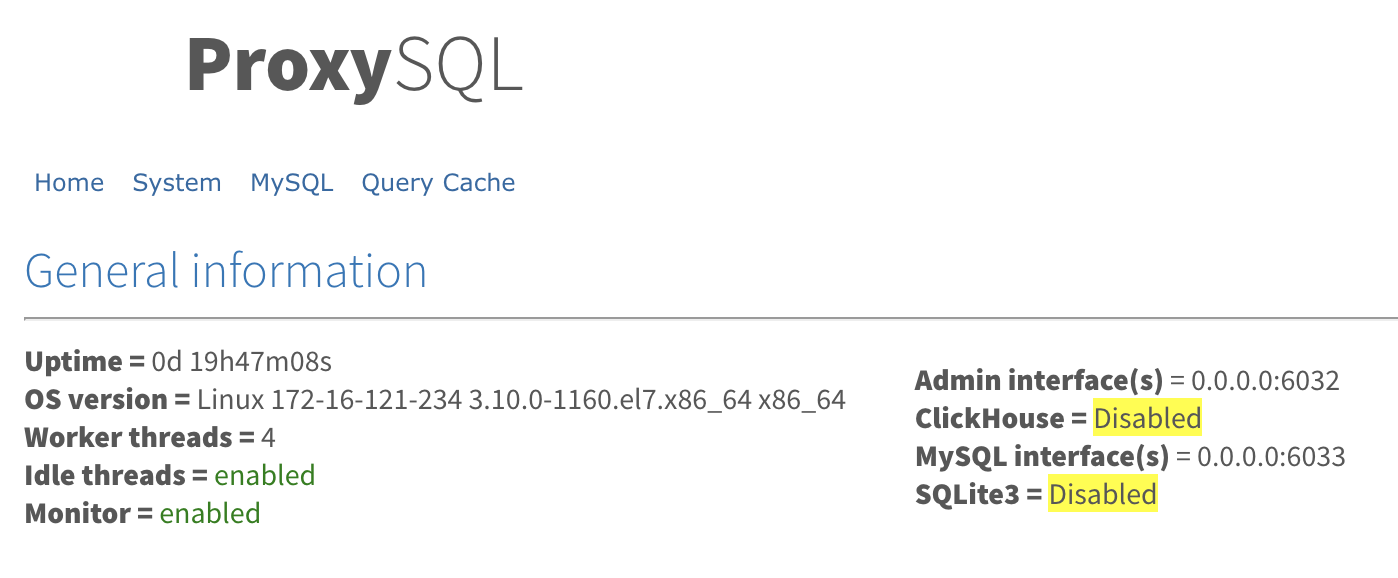
正式环境中,更推荐使用 exporter 的方式,通过 Prometheus 和 Grafana 的方式来做监控
TODO:优化